What is Docker? Let's Try Understanding
By Soumik — April 6, 2025

What is Docker? Let's try understanding
First of all, what is Docker?
Docker is a container based application that let’s you build, test, and run your application in an isolated environment. It helps you get rid of “it works on my machine” problem.
Let's understand what Docker is, what containers are, how the Docker network works, how VMs differ, what DockerHub is, and most importantly, how we can build and run one ourselves.
But, why not use Virtual Machine(VM) instead of docker?
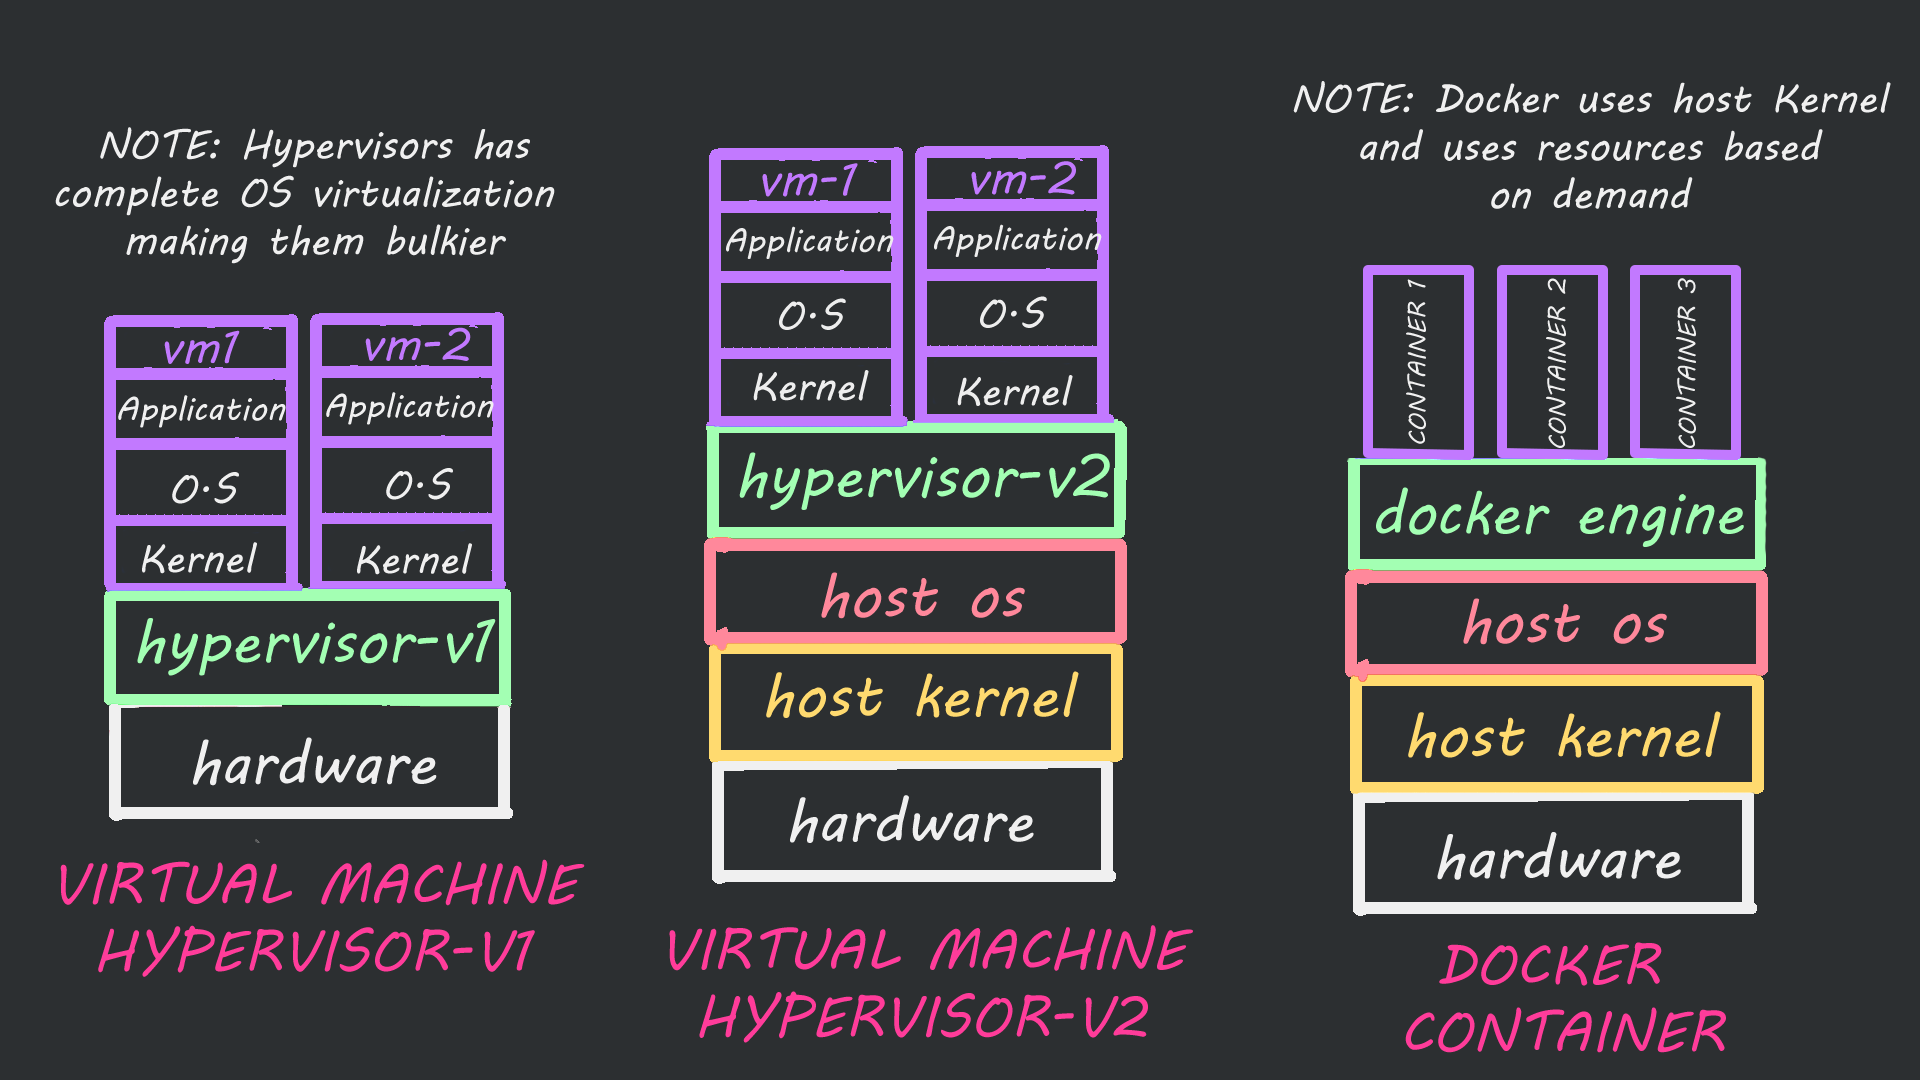
Talking about isolating, you might think why not use a VM? It lets us run completely different OS on top of our host OS similar to what docker does. But unlike VMs which are huge and take lots of time to boot up, docker containers are very fast, lightweight, scalable, portable, and efficient.
Image below shows how docker works compared to VMs:

Docker containers aren’t immune to kernel-level vulnerabilities though, every container uses the same kernel so that is one bad thing. Also, hypervisor 1 works on top of hardware whereas hypervisor 2 and docker work on top of host OS.
Reasons for using docker:
- No need for full OS installation: Docker containers share host OS kernel which reduces lots of CPU, memory, and storage loads resulting in much lower resource consumption.
- Isolated Environment: Docker containers run in an isolated environment, which makes applications run efficiently and secured in a shared hardware resource.
- Image Caching: Each instruction in Dockerfile is built in a separate layer, so when two or more containers use the same base image, docker reuses the layer which avoids duplication and saves disk space.
- More application: Since docker containers are lightweight, share host kernel, and also because containers use only necessary resources more containers can be built, which means more applications can run on a single machine.
- Ideal for microservices: Images are lightweight(uses layer caching and runs on host OS), scalable(scales up and down on demand), isolated(isolates each container), and easy to deploy(consistent everywhere and portable) which makes them ideal for microservices.
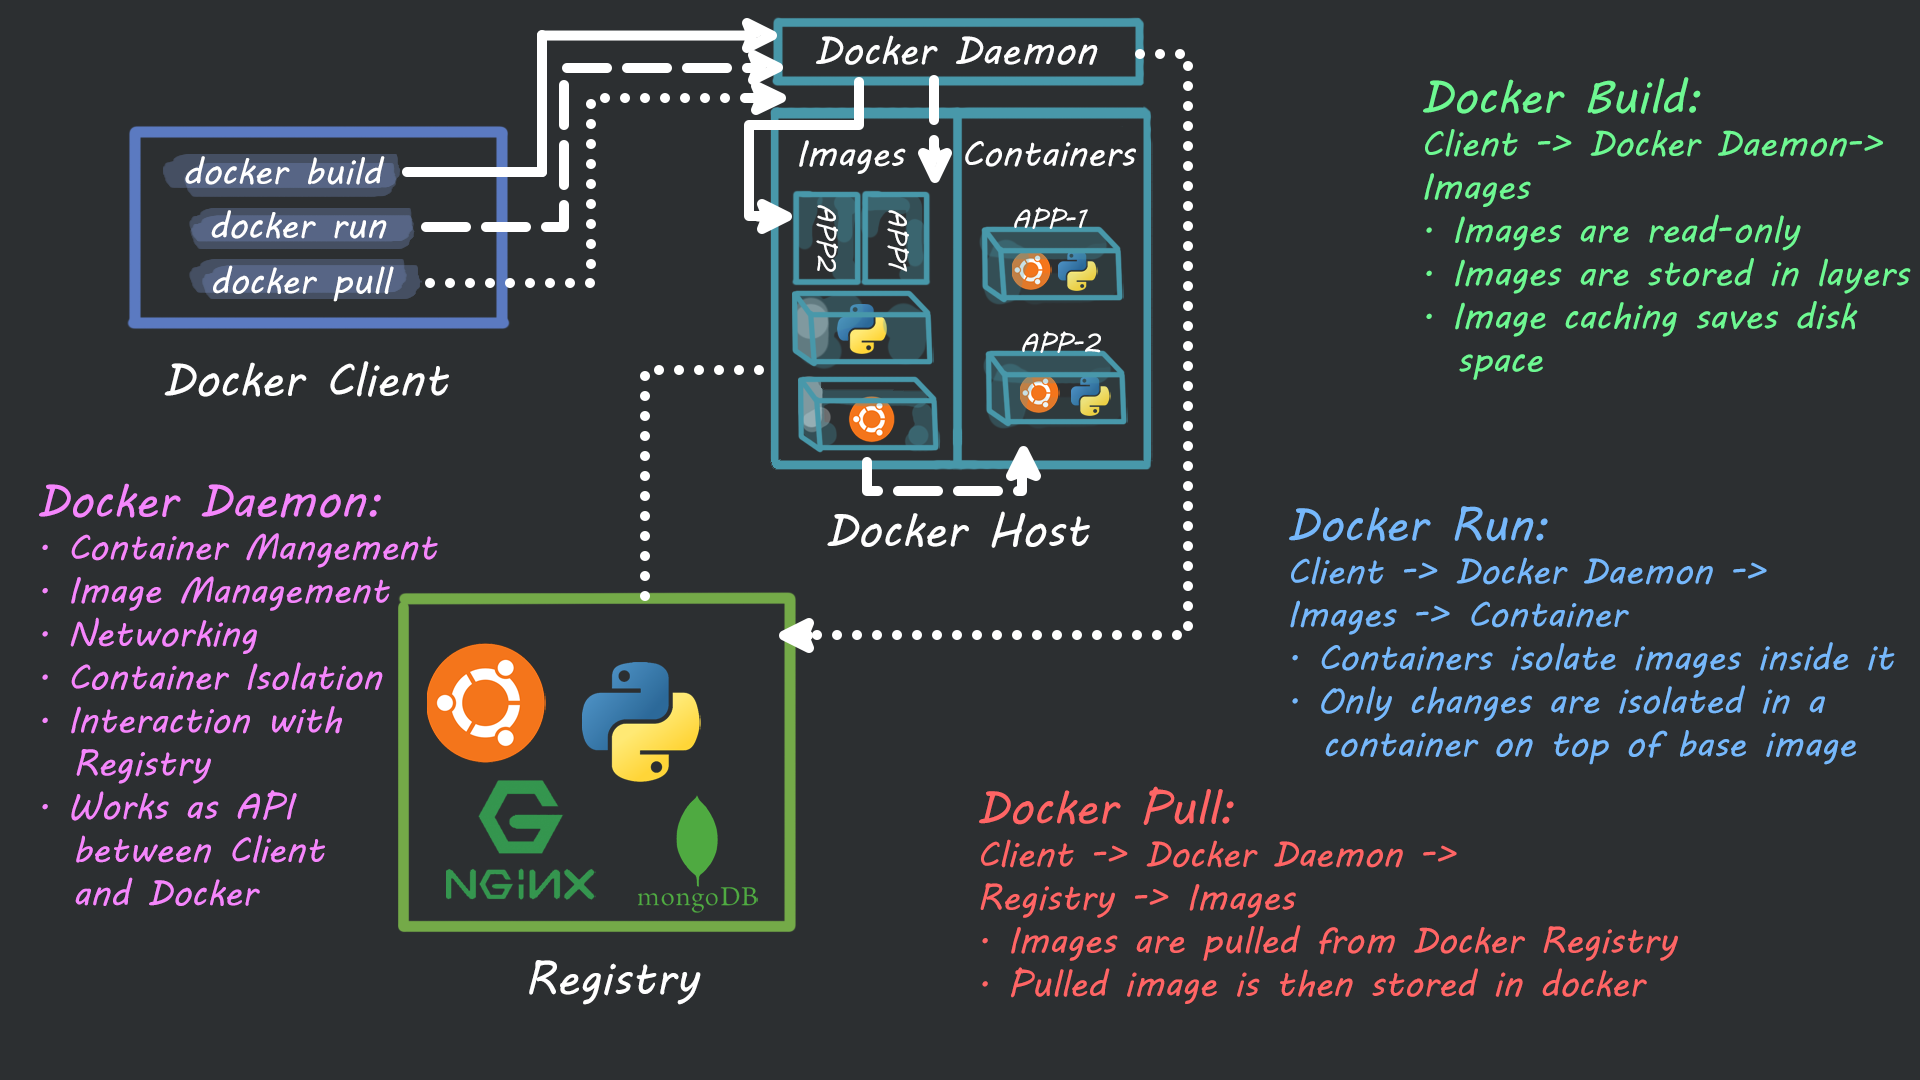
Below is an image of the docker architecture:

Let’s try building a docker image
Now that you know what docker is and how it is better than hypervisors, let's try building one...
Prerequisite:
- Docker Desktop
- Python3 (to run/test python file locally)
Building a Docker Image:
- Create simple App: First let's create a simple application using the Flask framework which will show “Hello world!“on a webpage.
# flaskapp.py
from flask import Flask
app = Flask(__name__)

@app.route("/")
def hello():
    return "Hello World!"
if __name__ == "__main__":
    appp.run(host="0.0.0.0")
- Create Dockerfile: Dockerfile will give instructions to the docker on how to create the docker image. To create a “requirements.txt” file and add
Flask==2.3.0inside it to install Flask.
FROM python:3.8-slim
WORKDIR /app
COPY requirements.txt /app
RUN pip install -r requirements.txt

COPY flaskapi.py /app
EXPOSE 5000
CMD ["python3", "flaskapi.py"]
FROM python:3.8-slim will install a lightweight python in a docker container, WORKDIR /app will create a new folder called app where we will store our files in container.
COPY copies requirements.txt file to the app folder, then runs the command pip install -r requirements.txt to install Flask.
Expose port 5000 so we can use it from outside.
At last, CMD ["python3", "flaskapi.py"] is used to run our app using python.
-
Build Docker image:
-tflag is used to name your image and.represents that we are building the current directory.docker build -t flask-api-image . -
Run the docker container:
-dflag runs the container in detach mode(in the background),-p 5000:5000maps port 5000 of the container with port 5000 of the local machine.flask-api-imageis the image name we created before.docker run -d -p 5000:5000 flask-api-image -
Verify container is running:
docker psthis command will list all the running containers. -
Access the flask API: Go to 'localhost:5000' on your web browser, you should see your "Hello World!" webpage ready.
-
Stop container: First get container ID using the command
docker psthen usedocker stop <CONTAINER_ID>to stop the container. -
To remove container:
docker rm <CONTAINER_ID> -
To remove an image:
docker rmi <IMAGE_NAME>
What about DockerHub? What is it?
DockerHub is a public docker registry where you can upload your images, pull images from there, and more, exactly how GitHub works. Now let's try pushing our image to DockerHub
How to push docker image to DockerHub:
- Create an account in DockerHub
- Assuming you have built an image in Docker in your local machine. We need to tag the image before we push it to DockerHub.
- Check the list of images that are present with the command:
docker imagesIt should look something like this:![[Pasted image 20241010004417.png]] - Tag the image in this format:
<DOCKERHUB USERNAME>/<REPOSITORY NAME>:<TAG>. Check username from DockerHub, give a repository name for your image, and give a version name in tag(e.g. v1, v2, latest) - Tag your image using this command:
docker tag <IMAGE_NAME> <NEW_NAME>. For me its:docker tag soumik10/flask-api-image:latest - When you use
docker imagesit will show two images now, but don't worry it creates a reference, not a duplicate. That's why both have the same CONTAINER_ID. - Log in to your DockerHub using
docker login(web-based login) ordocker login -u <DOCKERHUB_USERNAME> -p <DOCKERHUB_PASSWORK>to login through CLI. - On successful login use
docker push <IMAGE_NAME>:<TAG>to push your image to DockerHub. It should look something like this:![[Pasted image 20241010011111.png]] On visiting Repositories tab on your DockerHub you should see your recently pushed docker image live.
To update an image in DockerHub, you can perform the same steps as before. If you want to keep multiple versions of the image in the same repository, change the <TAG> value (e.g. v1, v2, 3.1,..) every time you push the image.
Pull Image from DockerHub
Now let's try pulling our published image from DockerHub.
Use the command docker pull <IMAGE_NAME>:<TAG> to pull the image from DockerHub.
In my case it's docker pull soumik10/flaskpi:latest`
TIP: docker system prune will clear cache, stop containers, network not used, and build cache.
What about configuring docker network and setting up volumes?
Docker network, volumes, and docker-compose are mostly beneficial for multi-container applications. Let's have a look at them how they work.
How docker network work?
There are different types of networks that we use in docker.
- Default Bridge Network: If no network is specified, docker uses this as default. It allows containers on the same host to communicate with each other but isolated from other hosts. So the docker connection goes
DOCKER->HOST->ROUTER - User-Defined Bridge Network: User defined bridge is used to isolate applications in a network. It's more flexible to work with than the default bridge. The command to create one is:
docker network create <NETWORK_NAME>. - Host Network: The container works as a host network as if you are running your application in your favorite IDE(e.g. VS Code). The good part is you don't have to expose any ports for it, as it runs in your localhost. To run a container in the host network the command is:
docker run -itd --network host --name <CONTAINER_NAME> nginx(you can change nginx with the image you want to run) - MACVLAN: This works on another level, so far host network has been allowing docker containers to run in localhost but now with MACVLAN you can run docker as a separate machine connected to your router. Your container will have its own MAC address and IP address. Command to create one is:
docker network create -d macvlan --subnet <ROUTER_SUBNETMASK> --gateway <ROUTER_IP> -o parent=<HOST_MAC>You can check the network list using the command:docker network lsYou can use a container shell using the command:docker exec -it <CONTAINER_NAME> sh
Docker Volume
Well docker volume is really simple, a container when removed or restarted all the data is deleted, to avoid losing important data, we mount the docker folder with the host machine.
It's like keeping a copy of the data in the host file, in case the container is removed or stopped.
Command to mount volume:docker run -v /home/mount/data:/var/lib/mysql/data <IMAGE_NAME> we are mounting host path /home/mount/data with container path /var/lib/mysql/data.
We can also use docker run -v /var/lib/mysql/data <IMAGE_NAME> docker will automatically create a folder for us to store the data.
Docker compose
Well, obviously it's annoying to write commands for deploying containers and managing network and volume. With docker-compose you can write down running one or more containers, managing the network, allocating volume, and assigning ports in a single .yaml file and watch things work for you.
Here is an example of a simple .yaml file:
version: '3'

services:
   nginx:
      image: nginx
      ports:
         - "80:80"

   back-end:
      image: api-flask
      volumes:
         - ./back-end/.env:/api-flask/.env
      expose:
         - "5000"
Conclusion
Companies are investing to deploy their application in cloud platforms and docker plays a key role in that. No more hassle of "works on my machine" and you can manage, and scale your application easily with docker.
